Monday, August 31, 2009

Homemade Christmas- Beanbags *first try*


Wahoo for the tutorial at Little Blue Boo! I now have 25 of these alphabet beanbags done for Jake. What's that you say? There are 26 letters in the alphabet? Well, yes, I know that. But somehow wither M (or W) did not end up with a stencil. And until I refill the printer cartridge so I can print another M (or W), the alphabet will remain incomplete.

What great about this project is that I did not cut the squares. I just ordered 5" precut squares from Ebay in a quilters charm pack. The colors all coordinate and it cuts down on work for me! And aside from a slight fabric paint/ pool table cover incident, the project went really smooth.

Yes, I know Jake is too young to spell, but he will have fun trowing them at things until that day. Now on to more Christmas presents!

Saturday, August 22, 2009

Little Yoda


Adorable he is.....

I'm so happy with his Yoda costume. It fits (and I hope it still does in 2 months) and will allow him to wear a coat as well. It's totally made of fleece and will keep him warm. I'm going to look for some green mittens and a walking stick to go with it. I love it- can't wait for Halloween!


Monday, August 17, 2009

Nursing Cover *first try*


I was so excited for this and I am happy with the results, but I learned a few things too....

I was going to follow the tutorial from Make if and Love it, but I got lazy. Instead, I just wung it and wound up making more work for myself than necessary. I'm still happy with it, but there are some things I will change next time....

1. Thinner straps, different lengths. I dislike that the clasp is behind my head now. That one will be shorter.
2. Next time I won't line it/make it reversible. I think it is too thick and could get hot. It will be nice for the recipient though- she is having a boy in the fall/winter!

I have some awesome fabric for me that I bought for a nursing cover. I don't HAVE to wait until preggers for it! : ) In the meantime, check out this awesome baby shower gift! Jealous much?


Pacifier Clips *first try*


Again, another tutorial from Make it and Love it.

This was sooooooo easy- it took about 10 minutes. I did cheat and instead of buying snaps and pounding them in myself, I just hot glued the part of the badge clip I tore off. Worked really well!


Plus, these are for a boy so instead of the ribbon in the button, I hot glued a stick-on from my scrap booking pile I rarely touch. It is hard to see, but one says shy (my options were limited) and the other is a star.

Burp Cloths *second try*


Ooooh I got these right!


This time I skipped the wonder under- yes, they are a little less stiff and I didn't get any gapping like I was afraid of. I also skipped the cute design. My serger just can't take curves and I needed to use it for the terry cloth. If I wasn't using terry cloth I would definitely do the curved design again. A little topping stitching and presto! I'm very very happy with the final result. See? Two Tries.......

Sunday, August 16, 2009

Halloween here we come!!


Alright- I am totally inspired and I have made my FINAL DECISION on Jake's costume this year. Are you ready for this? YODA!!!

This hat found at dollarstorecrafts (a cool site BTW) got me super excited to do my version of it. This will probably be the last year I get to choose his costume so I'm making the most of it. And now that I've blogged about it, it's final.

Little Girls Top


I admit, I love this little shirt. It was originally made for Zoa for Christmas, but due to my problems with sizing, there is no way she will fit in it by December. Plus- what fun are clothes on Christmas? (unless they are for me)

It is a peasant top and is one of the very first things I made when I dusted off my sewing machine. I found the pattern at make-baby-stuff, but I don't think it is there anymore. Look around though- lots of simple crafts that are great for first time sewers like myself.

There are fabric yo-yos on the front of the shirt that give it great texture (even though it is hard to see in the picture- I hope I'm getting a camera for Christmas). And there is a matching hair clip to boot. I really love it and hope the little girl who wears it someday looks as cute as I hope she will. As long as you don't look too close at the seams....

PS Ignore the white bow- it is part of the hanger.

Crayon Roll *first try*


There are lots of crayon roll tutorials out there (with some very good ideas I might add), but I had a purchased one for Jake that I wanted to make. I liked the felt part on the front and thought it would be simple to recreate. (recreate is the polite word for copy)

I learned some things.
1. My serger is evil and hates my projects. It's mission is to destroy them. One day, when I figure out what that blasted machine wants, my projects are going to look sooooo awesome.

2. The reason the gaps were so big between crayons on the original roll was because if they are too tight, the fabric gathers. That's why it is a little "rolled" even when open. I'm going to have to look into that. I like that the crayons in my roll do not fall out, but it would be nice if it laid flat.

3. You cannot iron felt. I already knew this, but did not think and there is the slight impression of iron on the felt. Also a lot of orange on my ironing board. Oh well.

I still think the roll came out great. There is a pocket for paper and stickers that I incorporated as well. I'm sure my second try (Jackson's Christmas gift to be) will be awesome.

STAY TUNED!

Saturday, August 15, 2009

Felt Hair Clips


I have found some absolutely wonderful blogs that I follow daily. Make it and Love it is one of them. You will see many of her items tried out on this site as I continue my "only homemade" Christmas present pledge. Check out the hair clips I made for a girl child I don't have using this tutorial.

Originally, the idea was to make a shirt with three coordinating fabrics, but clothes for Christmas? Yeah, if I were a kid I'd be disappointed too. So now I have the clips and I'm not sure yet where they will go. Some lucky girl....

If you can't tell, the first is a owl, followed by a fabric yoyo, followed by a bird. Yeah, they were practice. My second try will be must better (and true to form).

Homemade Christmas- Reversible Child Apron *first try*


First, you need to know that this year I have pledged to MAKE all child Christmas presents (along with most baby shower gifts). That directly involves 5 children, plus my own. He will have a good helping of made gifts, but also a few purchased ones as long as grandma is around...

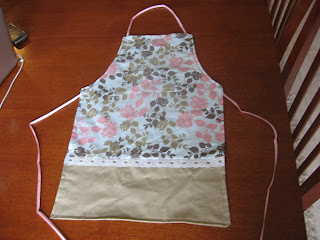
My first completed gift? Scotlyn's apron! You might remember from an earlier post that I made matching Mommy and child aprons for Maria. They turned out great, but then I found this tutorial from LangLangCreations. I LOVED it! I couldn't be happier with how it turned out!

I didn't do the crayon detail, and the front is the same as the back, but I sewed it just like they suggested. I already had the floral fabric cut out for an apron, but it would be too small for a 5 year old. So I found some brown fabric that matched and some cute ribbon to stick in there and it looks better than I planned. I did run a really thin line of fabric glue inside the bias tape just to hold it in place. It won't hold a lot- I just wanted something to keep it together.


And since Scotlyn is five, I doubt she will check this blog. Her present is safe. The only problem now is waiting until Christmas to give it to her.


Baby Burp Cloths


I have a cousin I rarely see coming into town on Tuesday, so I am attempting to whip something up for their 'baby in the works' and son Oliver. I have never met Chris's wife either, so I'm really looking forward to this trip.

For the baby, I thought about some cute burp cloths I had recently seen. I love the idea of the shape that fits on your shoulder. Also, at a trip to Hobby Lobby I saw the large terrycloth section. With my serger in my repertoire, I thought terry cloth would be a cool back piece. Wipes up puke nicely.


I had a great way to make a pattern- fold up a newspaper in fours and draw on the basic shape. That way, all curves will be equal. Then, once I had everything cut out and the pattern traced on with pencil (it washes off easily) I ironed them together with Wonder Under. I like that they are one big piece, but my husband thinks they are a little stiff. User preference I guess.


I serged all the way around and learned some not so fun things about my serger. For that reason (and that reason alone) They shape did not come out as perfect as I wanted. But still, I like them. I even freezer paper stenciled a J (last initial) on the burp pads and I love how how they turned out. TIP: don't slop on the paint- a even coat will do.
So I hope she likes them. I'm really looking forward to seeing what my grandma thinks- that serger will fill hours of conversation! I can only guess what projects of hers it ate.....

The Serger: My best friend and worst enemy


Ok, I am so fortunate to say that I have a serger! While visiting my grandmother, I mentioned that I would be asking for one for Christmas. She said she never used the one she bought, and thus, I now have my very own overlock machine! As I drove home with the thing, my eyes glassed over with dreams of the things I would serge. I excitedly called my husband to tell him I would no longer buy clothes! The serger could do it all!!

In reality- that machine can do a lot, but it is trying to kill me in the mean time. I spent 2 hours learning the ins & outs. Threading and rethreading and then screwing something up and rethreading again. For those without a serger- threading requires patience, a steady hand, and tools.....I rarely use a pattern and you think I have the patience to use TOOLS??!

It ate my first attempt- a green pair of pants for Jake made from a $1 skirt at Goodwill. It was so cute, but in hindsight, itchy material. The pants just kept getting smaller and smaller so I just threw them up into the air and sacrificed them to the failed-sewing-attempts-god. Luckily (or stupidly) I didn't give up.

I practically spent all day yesterday making things. Pretty much a dream come true if you ask me. Enjoy the next few posts!

Sunday, August 9, 2009

Felt Food Rocks My World!

Sweetie Pie Bakery Felt Cake GUEST GIVEAWAY!!!!

Oh my gosh I'm in love with felt food- how cute are these!!!! I feel a Christmas gift coming on....

We're Gonna Party Like it's Your Birthday


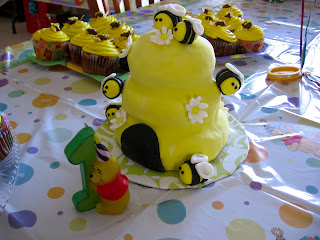
Yes, I am aware that Jake is 18 months now, but his birthday cake was my favorite one that I have made.


A little background:
My mother-in-law used to work for Hallmark and ended up with a bunch of throw away items- like first birthday items! So, because it was overwhelmingly Winnie the Pooh, Jake had a Winnee the Pooh themed birthday party. We had a good turnout- this kid draws a crowd!


For his cake, I made him a beehive with fondant hunny bees. I wanted to make about 50 fondant bees for the cupcakes, but I got too tired and ended up making the cupcake bees out of milk duds, almond slices, and frosting stripes. I love them! Jake had all cake for dinner- his first real dessert so I eased up on the nutrition rule. What a day. If you want to make a cake like this search YouTube for "beehive cake." They have some great pictures and hunny bee tutorials.


Can't wait for 2!!! Thanks Maria for the first and last photo on the post- you make us look good!

Zoa's Baptism Part 2


Wow, part two took a while to get here, but the quality of the pictures is MUCH BETTER! I am lucky enough to have a good friend who now does photography. Maria Watts is a great family photographer and has an eye for details. Check out her website at mjwattsphotography.com. You won't be sorry.

Of course, you can see a smattering of her pictures here. Notice how much nicer the cakes look! I love the little ones of Zoa, but I wish I had a picture of the bloomers that went with the outfit. Once I find a full body picture I'll have to post it. I never remember to take pictures.....dang!


The bloomers were very simple and made out of a pillowcase. I got the tutorial from here at Reclaiming the Home. My first attempt did not fit over her bum at all. I think she seems so much smaller in my head- hard to believe that her bum takes up that amount of space. The headband she is wearing I threw together at the last minute.


Want to know a secret? It was made out of underwear! HA! Not used underwear, of course. But the elastic band was the perfect silver match and the strap was adjustable so it would fit her for longer. (Not really, because again, I made it too small. I'm terrible with sizing!) The little frilly part was a ruffle I cut of and whipped together in a circle and sewed a cross on that was a necklace charm from a loooooong time ago. She looked good...as you can see for yourself.

Oh, and here is my little monster all decked out in his tie (while holding my shoe).

Tuesday, August 4, 2009

Death to Your Twenties


No, not MY twenties (thank heavens!) but my husband's. We had an amazing birthday weekend to prove it too. Friday, his actual birthday, we had a large party at the house and I got to try the carrot cake recipe I've been wanting to bake. It is his mom's, and unfortunately, my husband still thinks her version is better. I guess there is always something about how your own mom makes things...

Mine was pretty at least. And I'm going to go out on a pretty sturdy branch and say they party-goers enjoyed it. And after we got back from Kansas City's Power and Lights District and Oceans of Fun, it tasted awesome with the other leftovers. Ahhhhhhh... leftovers!

Here is the recipe for all who are interested. And yes, that is baby food in the recipe- it makes the cake so moist!

Carrot Cake:
3 jars of carrot baby food
4 eggs
2 cups sugar
1 tsp salt
2 tsp soda
1 cup oil
2 cups flour

Combine ingredients and bake at 350 degrees for 30 minutes.

Cream cheese frosting:
8oz pkg of cream cheese
1 stick melted oleo
3 cups powered sugar
1 tsp vanilla

Combine and frost! That's it.


And here is a picture of me yelling, "Who wants cake!"